Godot
The Godot SDK integrates our multiplayer platform with the Godot Engine. The plugin provides nodes and signals to use within your game client code - these communicate changes in state from your server side simulation to the game client itself.
If you are new here, we recommend starting with the Godot Quickstart Guide.
Pre-requisites
Godot Engine v4.2.1+ .NET version required
.NET SDK 6.0+ (Desktop target)
.NET SDK 7.0+ (Android target)
.NET SDK 8.0+ (iOS target)
Installation
Clone the Planetary Processing Godot plugin from GitHub.
git clone https://github.com/planetary-processing/godot-plugin planetary_processingCreate the 'addons' directory in your project if it does not exist.
Place the 'planetary_processing' directory in the 'addons' directory
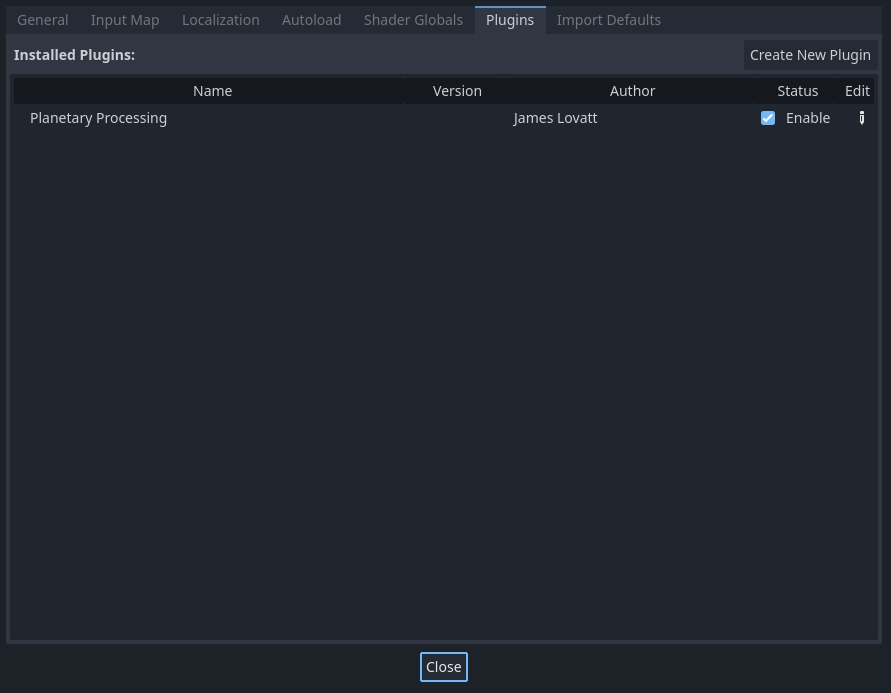
Enable the Planetary Processing plugin via the 'Plugins' tab in 'Project Settings'

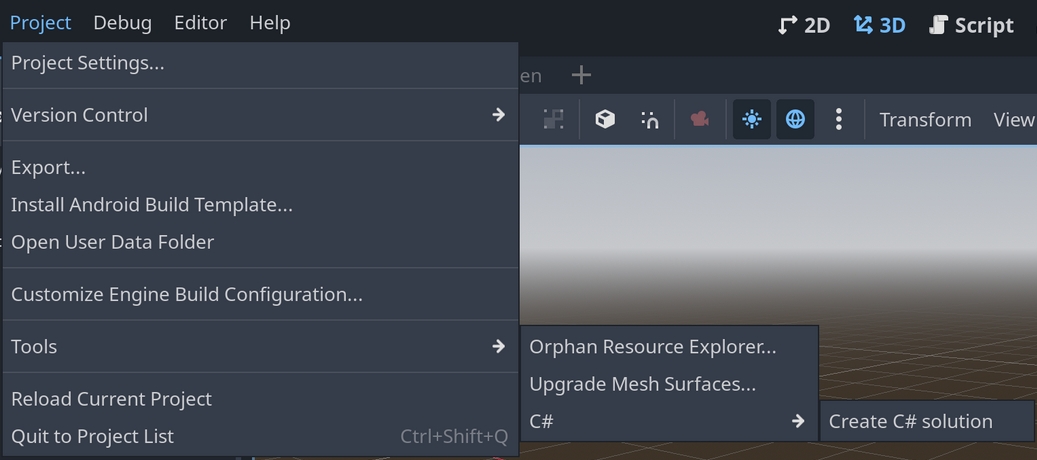
If not already setup on your project, you must trigger the creation of the C# solution via the Godot toolbar menu. This creates a .csproj and a .sln file in the root of your project.

Finally, we need to add a reference to the Planetary Processing C# SDK DLL to our .csproj file. This can either be done manually, or via the button in the PPRootNode inspector. To add manually, please ensure the following reference is added to your ItemGroup in your .csproj file
Nodes
Once the Planetary Processing plugin is enabled, three custom nodes are made available to your project: PPRootNode, PPEntityNode, and PPChunkNode.
PPRootNode
The Planetary Processing Root Node (PPRootNode) handles connections to your game backend, when running your game, while also enabling some additional functionality in the Godot editor.
A PPRootNode should be attached as a direct child of your main scene's root node. It is intended to be attached to your main scene so as to be accessible to all child scene instances, although this may vary dependent on your project structure. Due to the way the node handles connections to your game simulation, you should only have one PPRootNode in your project.

To configure your game, you must fill in the fields in the inspector:
Chunk Size - The size of chunks in your game, defined in the web panel game settings.
Player Scene - The scene representing your main player.
Chunk Scene - (Optional) The scene representing chunk storage in the world.
Scenes - An array of scenes with each element representing a different entity in your game.
Game ID - The ID of your game from the web panel, for Godot to connect to.
Server to Client Node - A Node which receives manual messages from the game server to the client.
Add Csproj Reference - If you have already added the "Planetary" reference to your .csproj file, then the Add Csproj Reference button will not be visible. If it is present, you can click the button to have the plugin automatically add the reference to your .csproj file.

PPEntityNode
The Planetary Processing Entity Node (PPEntityNode) describes a Planetary Processing Entity. This node is designed to be attached directly to the root node of a scene in your Godot project. This scene will then be instantiated as a child of your main scene. For example, a cat scene will correlate with a cat.lua entity in your Planetary Processing game.
With the PPEntityNode selected, you will be able to edit the following in your inspector:
Type - The type field should correlate with whichever server side Entity Type this scene is intended to represent, for example 'cat' or 'player'.

PPChunkNode
The Planetary Processing Chunk Node (PPChunkNode) describes a Planetary Processing Chunk. This node is designed to be attached directly to the root node of a scene in your Godot project. This scene will then be instantiated as a child of your main scene for each chunk in the world. Data passed to this node will come from the init.lua file on your Planetary Processing game server.
With the PPChunkNode selected, you will be able to edit the following in your inspector:
Type - The type field should be 'chunk'.

Signals and Messaging
Messages can be sent to your game server along a connection established by the PPRootNode. Signals from the server are sent to each of the PP nodes on the clientside. The Planetary Processing Plugin uses these signals to manage you game and entities, but you can also connect to these signals in your scripts.
Message to establish a connection
You may log a player in using the authenticate_player method on the PPRootNode. After logging a player in, the custom nodes will begin emitting signals.
Signal when player has joined
For the player who has just logged in, the PPRootNode will emit a new_player_entity signal. This signal is specific to the player running this instance of the game client. You can connect to this signal and extend the instantiation of your player scene as you see fit.
Signal when entities spawn
The PPRootNode will emit a new_entity signal for any entities that have not yet been seen by the game client. After first logging in, this signal will trigger for all entities in the game world, including other players. These scenes will then be instantiated and added to the scene's node tree. You can also connect to the signal.
Signal when entities despawn
If any entities have left the simulation, the PPRootNode will emit a remove_entity signal.
Signal when entities update
Each PPEntityNode will emit a state_changed signal each frame. You can use these signals to interpret movement from the server or trigger changes to your scenes as necessary. This script could be applied to the root node of an entity scene, for moving players or entities around the world.
Message to send data to the server
You can send regular updates from the player to the game server using the message() function on the PPRootNode. These messages allow the player to interact with the game simulation. It is up to you what data you want to send and how to process it in your server side code. All messages from the Godot client are received by the player.lua file on the server by default, unless you use direct messaging.
Depending on your game, you might choose to send updates every frame, on keyboard press inputs, or on a fixed time delta, for example every 33ms.
Your corresponding player.lua file would receive it like so:
Message to send data to a specific entity on the server
You can send a message to a specific entity instance on the game server using the direct_message() function on the PPRootNode. A direct message works much like a regular message. Except rather than being received by player.lua, it is handled in the message() function of the relevant entity. The entity's ID on the server will match the PPEntityNode's entity_id variable.
Server To Client Messaging
The PPEntityNode automatically receives and syncs all Entity data from the game world. Any client can access Entity data passed from the server, using the state_changed signal.
Alternatively, messages can be manually sent to a specific client using api.client.Message(). These message can be received by a designated Server To Client Node. This Node needs a custom script, with a function named server_to_client, which receives the server message as a parameter.
API
Below are reference tables of the API available within Godot's environment.
The PPRootNode, PPEntityNode, and PPChunkNode each expose various public methods which can be accessed within scripts by getting a reference to the node like so:
To connect to the server and join with the player, for example:
PPRootNode
Variables
player_uuid
string or null
Will be null when the player is not authenticated. Once a player authenticates, this will be set to their unique identifier
player_is_connected
bool
True if the connection is established.
Methods
authenticate_player
username: string
password: string
boolean: true if authenticated, will throw assertion error with error message if not
Authenticates a player with Planetary Processing. If the game is using anonymous auth, can be called with empty strings for arguments.
message
msg: Dictionary(String, Variant)
null
Sends a message to the player entity on the server, which can then be processed by your player.lua code.
direct_message
uuid: string
msg: Dictionary(String, Variant)
null
Sends a message directly to the entity with the specified UUID on the server, which can then be handled in its message() function.
Signals
new_player_entity
id: string
data: dictionary
Fired when the player entity representing the player using this game client is spawned in the server side game simulation
new_entity
id: string,
data: dictionary
Fired when a new entity is spawned in the server side game simulation
remove_entity
id: string
Fired when an entity is removed from the server side game simulation
new_chunk
id: string
data: dictionary
Fired when a new chunk is spawned in the server side game simulation
remove_chunk
id: string
Fired when a chunk is removed from the server side game simulation
PPEntityNode
Variables
entity_id
string
A unique identifier for the entity instance in the game world
type
string
The entity type. The value for this field is initially set based on the name of the root node of the current scene.
Signals
state_changed
state: dictionary({
x: number
y: number
z: number
data: dictionary
type: string
})
Fired each frame when the entity is still present in the simulation. Exposes the entity's coordinates, data table, and type. NOTE Planetary Processing uses 'y' for depth in 3 dimensional games, and 'z' for height, so this will need translating if your are running a 3D game
PPChunkNode
Variables
chunk_id
string
A unique identifier for the chunk instance in the game world
type
string
This should be 'chunk'. The value for this field is initially set based on the name of the root node of the current scene.
Custom Scripts
Methods
server_to_client
Dictionary(String, Variant)
Receives manual messages from the server. Must be assigned to a Node in the PPRootNode inspector.
Last updated

